For the first time, I'm writing something which is mostly a technical piece. Me being me, there is of course politics and social analysis in it, but this is primarily about the technical guts of my website. Regular programming will return shortly.
As of this morning, my website is no longer hosted on Vercel, instead sitting on a Hetzner VM in Helsinki. My databases and similar shall hopefully soon follow, as part of my project of pulling all my infrastructure out of the USA. In the interests of other people who might want to do the same, I thought it'd be wise to document what I did and why. So, to work!
Bernardo Stein, the noted brilliant engineer, NixOS maintainer and former high-up at multiple MANGA companies was kind enough to review the first version of this article and suggest some improvements. I am deeply grateful for his notes, and you can now read this article in the knowledge that someone significantly more accomplished than me has signed off on this not being completely godawful and an insult to engineering everywhere.
My website
My website is fairly uncomplicated from a technical perspective: it's a Nuxt application that uses Nuxt-Content to manage the blog and other content files, with two server routes for email subscriptions and a contact form, respectively. Most of the routes are server-side-rendered, and I'm increasingly moving towards build-time pre-rendering for most of my routes. I have a backend PostgreSQL database managed by Neon to store my email subscriptions, and I integrate with Postmark to send emails. All in all, this is pretty standard and uninteresting. If you want to work through this along with me with a trial application, any Node application that builds to a .output folder should do the trick. For reference, I'm working on Fedora 41, using VSCode as my IDE.
Why leave Vercel? Why Hetzner?
When I was first building my website I lacked a certain amount of confidence about setting up my own infrastructure and was still not as confident as I could be with Nuxt. I thus looked for the simplest deployment option possible, which looked to be Vercel. And for the time, it did the job: it kept my website up, made it available to a lot of people and was very, very simple to deploy to. Unfortunately, times change.
The proximate cause of my shift was the US election: I write a lot about LGBT issues and I'm quite outspoken on my blog, so if the USA tries to impose censorship on hosting providers, my website is at risk. I don't want to expose myself to the risk of that, so making the shift is an easy thing to do. This also has the benefit of partially insulating me from more wide-reaching political disruptions to US-based services, whatever they might look like.
There's also the fact that there's significant demand for sysadmin and Infrastructure-as-Code skills in the tech industry, that those roles are often hard to fill and that they're often more open to trans applicants than the sexier, higher-prestige app development roles are. Having portfolio projects for that kind of thing is thus very useful, and this looked to be a really good opportunity to do that.
Finally, Vercel is just not a very pleasant company. They cost a lot, their customer service isn't great and they've been known to play fast-and-loose with internal data privacy. I've also been experiencing an increasing number of weird bugs with the CDN and scaling in general: I've occasionally gotten 500 errors during traffic spikes that really shouldn't have caused that level of disruption. As my readership grows, a better solution is clearly needed.
I selected Hetzner as my cloud provider of choice for a few reasons. First and foremost, the company and the bulk of its datacentres are based in the EU, and the company is registered in Germany. Now, while the AfD is gaining an unpleasant level of popularity in Germany, the German and Dutch institutions seem to be considerably more robust to a fascist takeover than the US institutions were. Moreover, the authoritarians in Poland were significantly restrained by EU regulations, even when they were in power, and EU regulations around privacy, equity, equal access and all those nice things are among the strongest in the world. I might consider mirroring my site in Switzerland just in case, but for now, Hetzner goes a long way towards covering my bases and keeping me able to do the things I'm doing.
Setting up Hetzner
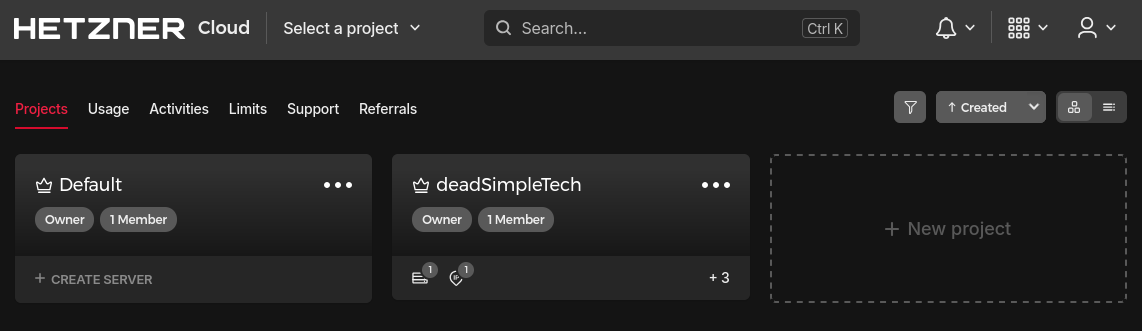
The first step in my migration was setting up a Hetzner Cloud account, which can be done on the Hetzner website. The first part of this is mostly just filling in forms and so forth, but once that's done you'll be presented with a dashboard that looks like this:
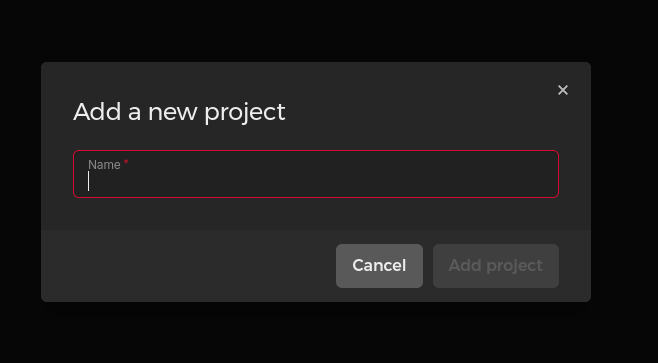
Your first step is to create a new project, which you'll be prompted to name:
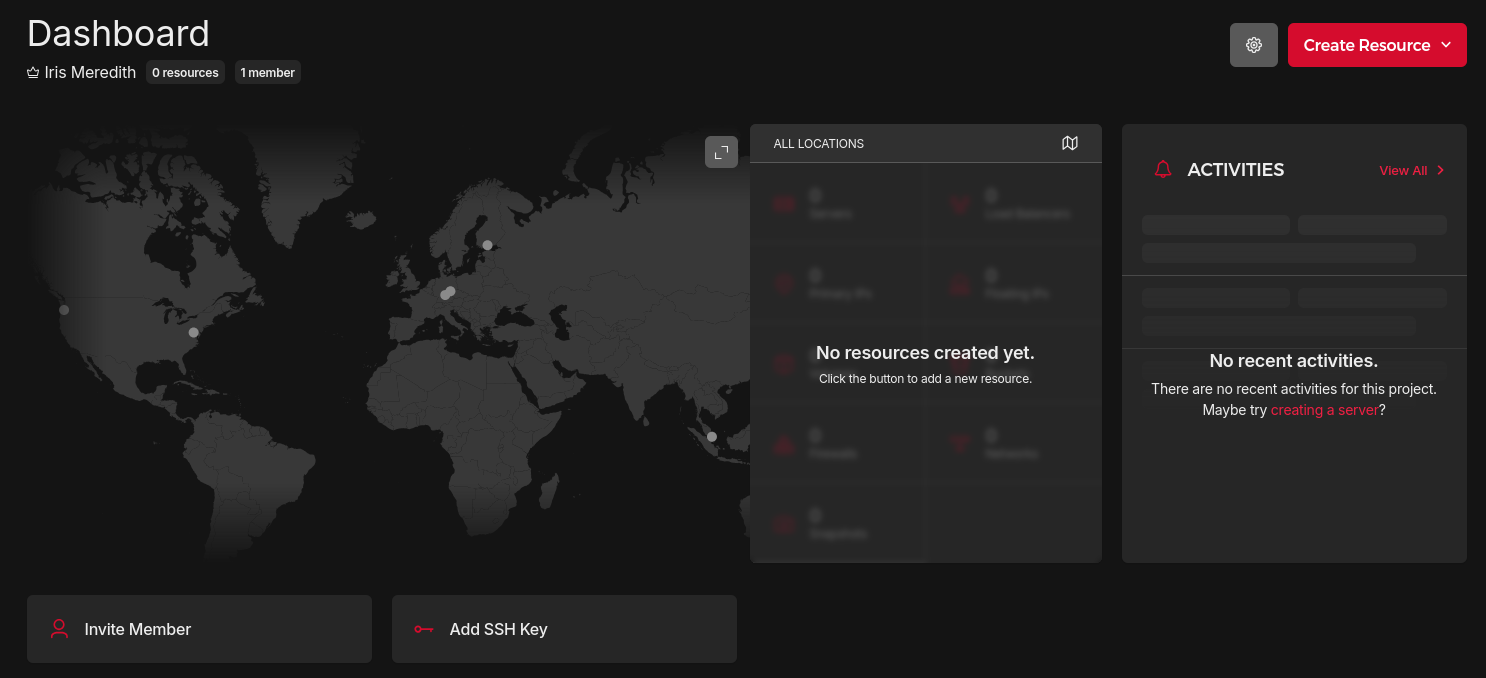
Having named it, click into that project and you'll be presented with this dashboard:
We'll be doing the vast bulk of our work using OpenTofu, but there are two things that we need to do here. The first is to generate an API key, which you can do in the security section of the left sidebar (marked by the little key). Click on that, generate an API key with read/write access and store it somewhere secure (pen and paper in a safe works, or a .env file on your local machine that you make sure to never commit anywhere. Secret managers work pretty well too.) The second thing you'll want to do is add a default SSH key to your project: if you've got an SSH keypair pre-generated for your local machine, you should be able to find it by running
cat ~/.ssh/id_ed25519.pub
This returns the public key for your SSH keypair, which you can copy into the appropriate box in Hetzner. If you don't have a generated keypair, you can generate one by running
ssh-keygen
first.
Two points to note here: firstly, the file in the same directory with the same name but no .pub suffix is your private key, which must never be distributed anywhere. Secondly, this is assuming that you're using the ed25519 cipher1, which is the most secure and is the current default for SSH on most distributions. There is a chance that you'll be presented with an RSA key instead: you can switch to ed25519 if you like and it will be more secure, but RSA is still, realistically speaking, very hard to break.
And that's about all we need to do with Hetzner! There are a bunch of other bits and pieces we can do later, but everything we're going to do from now on will happen in OpenTofu.
OpenTofu
Now, we might notice that we've only done some very basic operations in Hetzner, but that's already involved an awful lot of clicking through menus, during which it's easy to fuck something up. It's also very difficult to make a process like that replicable or track changes in it. This means that, even for a project like this, with one server, very lightweight network infrastructure and one user, setting things up in an Infrastructure-as-Code tool can be invaluable. I've elected to use OpenTofu, which is an open-source fork of Terraform started after Hashicorp decided to switch to the Business Source License (for which they will forever live in ingnominy). For my current purposes, a local installation will do the job just fine, which we can do with the official OpenTofu install script as follows:
curl --proto '=https' --tlsv1.2 -fsSL \
https://get.opentofu.org/install-opentofu.sh -o install-opentofu.sh

# Give it execution permissions:

chmod +x install-opentofu.sh

# Please inspect the downloaded script

# Run the installer:

./install-opentofu.sh --install-method rpm

# Remove the installer:

rm -f install-opentofu.sh
This should, all going well, install OpenTofu on your machine. We can now pull up the project we wish to deploy in VSCode (which is still my preferred IDE despite everything), and create a new directory in the project root called opentofu. In that directory, we create a file called main.tf (in larger projects, we'd want to have separate files for providers, resources, variables and outputs, but for something this small it's probably needless overhead). This file, for now, just contains the following:
terraform {
    required_providers {
    hcloud = {
        source = "hetznercloud/hcloud"
        version = "1.46.1"
        }
    }
}

variable "hcloud_token" {
    sensitive = true
    type = string
    description = "Hetzner Cloud API Token"
}


provider "hcloud" {
    token = var.hcloud_token
}
The first block here configures how OpenTofu is going to behave: in this case, we just tell it that it's going to need the Heztner Cloud provider for this workload. If we wanted to use a different cloud provider, such as AWS or Azure, we'd need to find the relevant provider details and put them in here instead. The second block defines an input variable, which lets us customise how OpenTofu behaves without having to edit the source: in this case, the variable takes its definition from the Hetzner API key we generated earlier. Finally, we use the defined variable to create a provider, which is a plugin that interacts with your cloud platform (in this case Hetzner) on OpenTofu's behalf. You'll note, of course, that the API token isn't actually defined in here: we do that in a file called terraform.tfvars, which in this case simply looks like this:
hcloud_token = <HETZNER-TOKEN>
If you're following along with this article, you'll want to replace the HETZNER-TOKEN tag in its entirety with your token. It's also worth noting that this should be treated like a .env file: do not commit it to any repositories and do your best to make sure it doesn't get into the wrong hands.
This being done, we can now run
tofu init
from a terminal within the directory we created, which will download the providers we need and create a lockfile, then tell you that initialisation has been successful. We're now ready to create some resources, of which the first will be a firewall. The resource block for that looks like this:
resource "hcloud_firewall" "web_server_and_ssh" {
name = "Web Server and SSH firewall"
    rule {
        description = "Allow HTTP traffic"
        direction = "in"
        protocol = "tcp"
        port = "80"
        source_ips = ["0.0.0.0/0", "::/0"]
    }

    rule {
        description = "Allow HTTPS traffic"
        direction = "in"
        protocol = "tcp"
        port = "443"
        source_ips = ["0.0.0.0/0","::/0"]
    }

    rule {
        description = "Allow HTTP/3 traffic"
        direction = "in"
        protocol = "udp"
        port = "443"
        source_ips = ["0.0.0.0/0","::/0"]
    }

}
The resource type that we're creating here is h_cloud_firewall, or a Hetzner firewall. We've given it an identifier for use in this script, and a name that can be seen in the console. We've also created three rules to allow inbound http and https traffic. Bernardo suggested opening port 443 to UDP traffic here, as it allows browsers to use HTTP/3, which is both a faster and a more secure protocol: I've taken that on board here. For my deployment server, I don't allow ssh access, as this is more secure, but during debugging and for maintenace, being able to ssh into your deployment server can be useful. If you want to do that, you can add the following rule:
  rule {
    description = "Allow SSH traffic"
    direction   = "in"
    protocol    = "tcp"
    port        = "22"
    source_ips = ["0.0.0.0/0","::/0"]
  }
We'll then want to create network and subnet resources to allow the server we create to access the internet as a whole: a web server with no web access isn't very useful, after all. To do this, we can add the following blocks to main.tf:
resource "hcloud_network" "deadsimple_network" {
    name = "Network for deadSimpleTech infrastructure"
    ip_range = "10.0.0.0/16"
}

resource "hcloud_network_subnet" "deadsimple_network_subnet" {
    type = "cloud"
    network_id = hcloud_network.deadsimple_network.id
    network_zone = "eu-central"
    ip_range = "10.0.1.0/24"
}
This creates a set of local IP addresses that can be used to address various resources in your Hetzner Cloud and connect them to each other. Without this, you'd have to specify virtual LAN connections between your resources, which is doable in theory, but a local network is much nicer to work with. The only real point of interest here is the network zone: you have to specify a region that each of your subnets lives in, and given that my website is going to live in Helsinki, that'll be the eu-central zone. There's now one more step before I create the server: define a data block for the SSH key I want to use for this server when debugging:
data "hcloud_ssh_key" "local_ssh_key" {
    name = "Local SSH Key"
}
This simply brings the SSH key that we specified in the Hetzner console into OpenTofu so that it can be referenced. With all this in place, we can now create our server: note that this is in debug configuration, so I do have an SSH key configured:
resource "hcloud_server" "deadsimple_website_server" {
    name = "deadsimple-website-server"
    server_type = "ccx13"
    location = "hel1"
    image = "fedora-41"
    ssh_keys = [data.hcloud_ssh_key.local_ssh_key.id]
    firewall_ids = [hcloud_firewall.web_server_and_ssh.id]
    network {
        network_id = hcloud_network.deadsimple_network.id
    }
    user_data = file("${path.module}/init.yaml")
    depends_on = [hcloud_network_subnet.deadsimple_network_subnet]
}
This is mostly pretty self-explanatory, but there are a few points worth touching on. Firstly, I've chosen a dedicated server type for this server: it's somewhat more expensive than a virtual server, but I like the comfort of having a machine to myself. Next, I've set the location to Helsinki (as I promised). The image I want is Fedora 41: Debian is probably a more conservative choice for a web server, but I do have a preference for Red Hat based distros, so I made a somewhat unorthodox choice here. We assign the machine a network, a firewall and an SSH key in fairly standard ways of configuring this. Finally, we assign the server a user_data field: this is a cloud-init YAML file sitting in the same directory as main.tf that installs software and executes initial commands on server creation, which is what we'll discuss in the next section.
Finally, for DNS purposes, we need the public IP of the created server, which we can get by defining an output block:
output "server_public_ip" {
    value = hcloud_server.deadsimple_website_server.ipv4_address
}
We can now run
tofu apply
from our directory, which will create all the resources and print the public IP of the created server to output. We can then, if we've set up SSH, access our newly created server with
ssh root@<PUBLIC-IP>
When you're done playing with your new server, you can tear down your infrastructure with
tofu destroy
So, we now have our infrastructure and a server set up, but it's not doing much of interest. Let's have a look at how to actually deploy some code to it.
cloud-init
There are four options we can take to getting our server configured. The first is to SSH into the server and do everything manually, and this is the way that most people start. The main point here is that you need to know how to do things manually in order to automate them, and to that end it's worth configuring a web server once. That said, for production purposes, this option is lacking: as with the infrastructure, it's hard to reproduce what was done and easy to mess things up. Some degree of automation can be had with the sufficient application of bash scripts, but that is in itself heavily error-prone and insecure, so choosing an option that's slightly more fit-for-purpose would be a good idea.
The second option is an automation tool like Ansible. Ansible is pretty suited to this use case: it allows you to automatically provision, configure and deploy applications to a variety of managed nodes using a toolchain built on SSH. It also integrates well with OpenTofu, and for a more complex deployment, it might well be worth using. That said, this project is (for now) rather simple, and adding another tool to the stack seems exhausting. It also requires SSH configuration, which as we've already established, I don't much like.
Another option is to create a custom image using a tool like Packer. While I think this solution has a lot to recommend it, it's not something I'm hugely familiar with at present, so I decided to leave that be for now.
The final option is to use the user_data field in the setup with an init.yaml file containing cloud-init data. cloud-init is simply a tool that feeds unique user data and config to an instance on instance creation, and while it isn't the most powerful tool in the world, it's plenty powerful enough for what I need from it. The beginning of my init.yaml file looks like this:
#cloud-config

users:
- default
- name: fedora_server
  shell: /bin/bash
  groups:
      - sudo
  sudo:
    - ALL=(ALL) NOPASSWD:ALL
  lock_passwd: true
The first line of the file tells the interpreter to interpret this as a cloud-config file. You can, if you're so inclined, feed it a bash script instead if you change the first line, but in this case I'm quite happy with the cloud-init YAML. The next few lines set up a default user and a server user, which is the user account we'll actually use to build and run our web server. We name the user, set the shell to bash and give the account sudo permissions with no password: we'll use this later in the run commands stage. Finally, we disable password logins for this user. The next step is to write a Caddyfile to the server, as we'll be using Caddy as our reverse proxy:
write_files:
- path: Caddyfile
content: |
deadsimpletech.com {
    tls internal
    reverse_proxy :3000
}
owner: 'fedora_server'
permissions: '0644'
This creates a basic configuration file to run Caddy as a reverse proxy for the local process we'll be running on port 3000. As I wound up using Cloudflare for a CDN and TLS, I'm currently using a self-signed certificate for communication between my server and Cloudflare: I intend to change this to an origin certificate soon, but for now this will suffice. This being done, we can now run the rest of our commands:
runcmd:
- su fedora_server
- sed -i '/PermitRootLogin/d' /etc/ssh/sshd_config
- echo "PermitRootLogin no" >> /etc/ssh/sshd_config
- sed -i '/Password Authentication/d' /etc/ssh/sshd_config
- echo "Password Authentication no" >> /etc/ssh/sshd_config
- systemctl restart sshd
The first task is to secure the system. In this case, this means disabling root login and disabling password authentication for SSH on this machine: hypothetically, attempts to connect via SSH should be blocked by the firewall and the lack of a key in the production system, but if that happens to be wrong, disabling these things is probably a good idea. We shift to using the default user before executing these, and at the end of this process we have to restart the ssh service, which is running on systemd.
- export POSTGRES_URL=<POSTGRES-URL>
- export POSTMARK_SERVER_TOKEN=<POSTMARK-TOKEN>
Next, we have to set two environment variables: the API server token for Postmark and the connection URL for my PostgreSQL database. To use this, you'd want to replace the tags above with your credentials. It's important to note that init.yaml is very similar to a .env file in this context (it contains credentials), so it needs to be .gitignored and treated as a secret. Honestly, I don't like this much myself and I'm thinking about alternative options for this (which I'll write up in the next article on my migration), but for now, this suffices. Now we can install the packages we need:
- sudo dnf update
- sudo dnf upgrade
- sudo dnf install 'dnf-command(copr)' -y
- sudo dnf copr enable -y @caddy/caddy -y
- sudo dnf install caddy -y
- sudo dnf install nodejs -y
- sudo dnf install git -y
- sudo npm install pm2 -g
This is fairly standard: we run standard updates and upgrades on our system first, and then install the Caddy repository, followed by Caddy itself. We then install the Node runtime and git, and finally, as we want to run our server without blocking, we'll need to install PM2 to manage our Node process. Now we can finally pull in and build our website:
- git clone -b dev <GITLAB-DEPLOY-KEY>@<GITLAB-URL>
- cd dead-simple-consulting
- npm install
- npm run build
I've elected simply to clone my website repository (the development branch in this case) with git, then shift to the repository root, install packages and build the website. In an ideal world, we'd have a separate build server, and that is something that I'm working on, but this was the simplest option. As I'm cloning from a private GitLab repository, I've included a deploy token that I generated: this is strictly speaking a credential, but it's locked-down enough that it's fairly low risk to expose, even with my previous precautions. Finally, we can start our processes!
- pm2 start .output/server/index.mjs -i max
- cd ..
- caddy run
Here we use pm2 to start one process of the Node server in the output for each core we have available (two in this case). We then leave the directory and start Caddy using the configuration file that we created earlier. Now we can just run
tofu apply
in our root directory, wait for a minute or so and we now have our website available on a public IP!
DNS and Cloudflare
We now want to make our website available to people via our domain. This is, in theory, fairly simple: log in to your registrar and add two A records redirecting the root domain and the www domain to your IP address. I did this with my registrar (Namecheap), and pretty quickly was rewarded with a working website. Unfortunately, I was also presented with a good ten seconds of latency before I was able to load my website for the first time: it turns out that the latency between Helsinki and Hamilton is considerable. Who'd have thought? Clearly something to speed things up a bit was needed.
To that end, I shifted to Cloudflare's DNS and CDN. The process is relatively simple: you simply shift your DNS over to Cloudflare, which it can usually do automatically, then change out your registrar's standard nameservers for Cloudflare's. After that, you will usually have to fiddle with some settings: you'll want full TLS for your traffic, and you'll also want to turn DNSSEC back on after you turned it off during this process. Then you have to wait for the nameservers to update, which is a slow and annoying process, but once that's done... there you have it: a perfectly serviceable web server running Node and serving a website over TLS!
Internal code changes
There were also a few smallish changes I had to make to the internals of my website where it depended on Vercel-specific libraries. First off, I had to change my email subscription route. In the initial state the subscription route function looked like this:
import { sql } from "@vercel/postgres";

async function subscribe(email, opt_ins){

console.log(email)

    const response = await sql`INSERT INTO emails (email_id, email_address,
    opt_ins) VALUES (DEFAULT, ${email}, ${JSON.stringify(opt_ins)});`

    return response

}

// Here follows the event handler
This relied on Vercel's proprietary PostgreSQL adaptor, which obviously isn't going to fly here: we have to replace it with node-postgres. Fortunately, that's easy to do:
import pg from 'pg'

const { Client } = pg

async function subscribe(email, opt_ins){

    const connectionString = process.env.POSTGRES_URL

    const client = new Client({ connectionString, })

    await client.connect()

    await client.query('INSERT INTO emails (email_id, email_address, opt_ins)
    VALUES (DEFAULT, $1, $2);', [email, JSON.stringify(opt_ins)])

    await client.end()

}

// Here follows the event handler
This is a partial rework that covers off most of the important points. That said, Bernardo has pointed out that this creates a new client each time someone hits this endpoint, which can very easily eat a lot of PostgreSQL's allowed connections: less than idea. Moving the client creation out of the function leads to this:
import pg from 'pg'

const { Client } = pg

const connectionString = process.env.POSTGRES_URL

const client = new Client({ connectionString, })

async function subscribe(email, opt_ins){

    await client.connect()

    await client.query('INSERT INTO emails (email_id, email_address, opt_ins)
    VALUES (DEFAULT, $1, $2);', [email, JSON.stringify(opt_ins)])

    await client.end()

}

// Here follows the event handler
Now, you might think this is all well and good. node-postgres, however, is not designed for you to use raw connection objects, and this code consequently exhibited some pretty strange behaviour. The solution was to replace it with a connection pool object, which lazily creates and destroys connections as needed:
import { ServerClient } from "postmark"

import pg from 'pg'

const { Pool } = pg

const connectionString = process.env.POSTGRES_URL

const pool = new Pool({ connectionString, })

async function subscribe(email, opt_ins){

//Logs email to my inbox

var client = new ServerClient(process.env.POSTMARK_SERVER_TOKEN)

const response = await client.sendEmail({'From': '[email protected]',

'To': '[email protected]',

'Subject': 'Email_subscription_attempt_log',

'TextBody': email + '\n\n' + JSON.stringify(opt_ins)})

const res = await pool.query('INSERT INTO emails (email_id, email_address, opt_ins) VALUES (DEFAULT, $1, $2);', [email, JSON.stringify(opt_ins)])

const response_new = await client.sendEmail({'From': '[email protected]',

'To': '[email protected]',

'Subject': 'Database_insertion_response',

'TextBody': JSON.stringify(res)})

}

// Here follows the event handler
I've also elected to log subscriptions to an email address here, as it lets me see what's going on in during subscriptions and debug any issues that arise. This is a bit more verbose, but hardly the end of the world. The second thing to change was to switch out Vercel Analytics for Umami, which mostly just involves fiddling around in nuxt.config.ts.
And that's it: a rough, slightly messy but functional and effective deployment of a Node website on Hetzner!
Footnotes
- This is an elliptic curve cipher, and it's very cool. It comes from a curve that looks like this:
 ↩
↩